TypeScript Stack Data Structure
Learn how to create and use a stack data structure with linked lists using typescript.

Today we will be creating our own Stack data structure using single linked lists.
If you are interested in the Queue data structure implementation, check out the very similar article here, if you missed it.
So what is a stack?
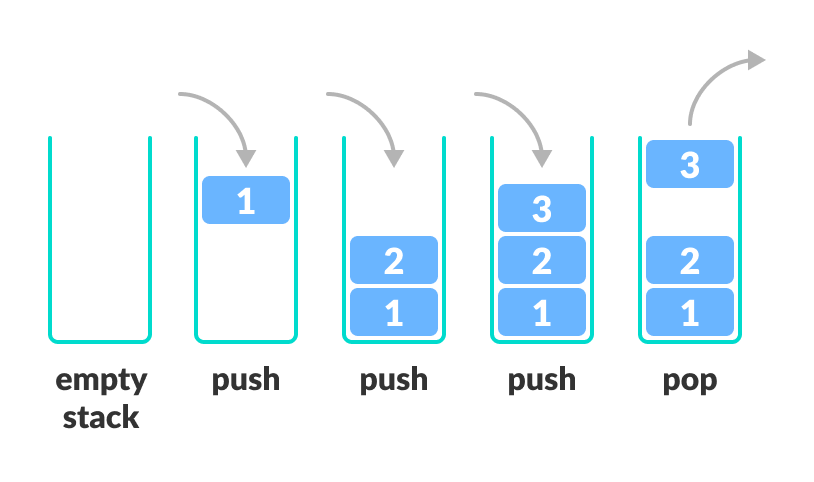
Stack is an abstract data type and a data structure that follows LIFO (last in first out) strategy. It means the element added last will be removed first. Stack allows two operations push and pop. Push adds an element at the top of the stack and pop removes an element from top of the stack.
What about Single linked list?
Single linked list: a list where elements have only a reference to next element
Big O measurement for Queues.
- Insertion O(1)
- Removal O(1)
- Searching O(n)
- Access O(n)
What are some use cases of using stack data structure?.
- Stack tracing - trace all your function calls in order.
- undo/redo operation - since stack is first in last out order, we can get our most recent action from the stack and undo it very easily.
- Stack increases the efficiency of some algorithms
More examples can be found using your favourite search engine.
Same as we did in our Queue article, we are going to create a node to be used for our single linked list.
class StackNode<T> {
    next:QueueNode<T> | undefined
    constructor(public value:T) {

    }
}Again we use generics so we can know what expect back when we get our node.
We define only next as we will not have previous like in double linked list.
We are going to create our stack class which exposes 2 methods,
push - adds value to the queue.
pop - removes value from the queue
We will use a generic here as well to work with the types we define.
class Stack<T> {
    first:StackNode<T> | null
    last: StackNode<T> | null
    size = 0

    push(value: T){
        const node = new StackNode(value);

        if (!this.last) {
            this.first = node;
            this.last = node;
        } else {
            const previousFirst = this.first;
            this.first = node;
            this.first.next = previousFirst;
        }

        return ++this.size;
    }

    pop() {
        if(!this.first) {
            return null;
        }

        const first = this.first;

        if(this.first === this.last){
            this.last = null;
        }

        this.first = this.first.next;
        this.size--;
        return first.value;
    }
}Our class has 3 properties, first , last, size
- size - represent the size of the queue
- first - represent the first node in the linked list
- last - represent the last node in the linked list
As you can see the code above is very self explanatory.
We handle the edge cases in each of the methods, update the this.size property to know the length of the stack.
Next lets use our newly created Queue class
type MyValue = {
    firstName: string
    lastName: string
}

const stack = new Stack<MyValue>()

// returns 1
stack.push({
    firstName:'tom',
    lastName:'howl'
}),
// returns 2
stack.push({
    firstName:'wolf',
    lastName:'stein'
}),
// returns 3
stack.push({
    firstName:'jake',
    lastName:'strong'
})

//returns tom
stack.pop(),
//returns wolf
stack.pop(),
//returns jake
stack.pop(),
//return null
stack.pop()This is all for the stack creation using TypeScript.
Stay tuned for more data structures examples in TypeScript.